Create a Slide Show with Text
1. Go to the page on which you want to add the slide show.
2. Click Edit This Page ( ) in the bottom or top of your screen (the location varies depending on your CMS skin design).
3. Add an HTML Content web-part to one of the panes.
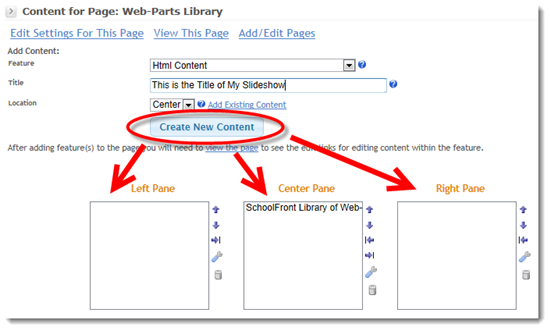
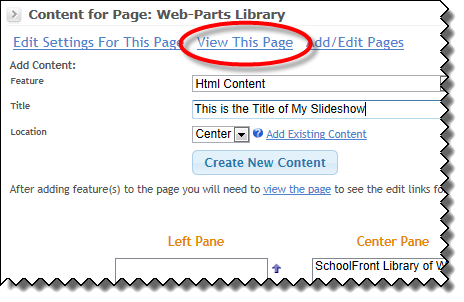
4. Click the View This Page link.
5. Click Edit (  ) to open the HTML WYSIWYG editor.
6. Enter the text you want in the slide show into the HTML WYSIWYG editor. Separate the "slides"--i.e. indicate points of slide transition--with a carriage return.
7. Once all of the text has been entered into the HTML WYSIWYG editor, click the Update or Save button.
8. Click the Settings link ( ) to open the settings for the HTML Content web-part.
10. Click Slide Show Settings on the HTML Content Settings tab.
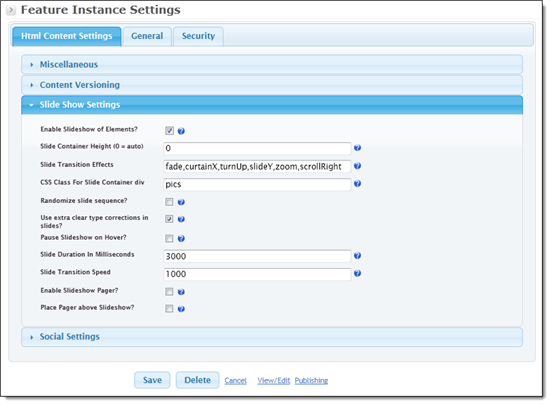
9. Check the checkbox next to Enable Slideshow of Elements.
10. If you have a preference about the height of the slideshow, enter a height in the field labeled Slide Container Height. If you want it to auto-size the height, leave "0" (zero) in the field.
11. In the field called Slide Transition Effects you can specify the transtion(s) to use between slides. You can specify a single transition or a comma separated list of them like fade,curtainX,turnDown
Possible values include:
-
fade
-
curtainX
-
curtainY
-
scrollUp
-
scrollDown
|
-
scrollRight
-
scrollLeft
-
slideX
-
slideY
-
turnUp
|
-
turnDown
-
turnRight
-
turnLeft
-
zoom
-
shuffle
|
12. Skip this step if you are not familiar with HTML. The field called CSS Class For Slide Container div is an advanced setting, you should leave it blank unless you have some understanding of html and can edit using the Html view of the editor.
The purpose of this setting is to make it possible for you to have some content that is not part of the slide show. By default, when this setting is blank, all html elements in the content are treated as slides in the slideshow.
For example if you only want some of the content to be a slide show, you could specify myslides as the CSS class for the slide show container. Then using Html view of the editor wrap a <div class="myslides"> </div> around the set of elements that you want to be slides. Then only elements within this div will be slides and content outside the divs will be static.
You can even have multiple slideshows with static content between them by creating multiple divs as indicated above.
13. If you have a bunch of pictures and you want the slide show to randomize display of the images, check the checkbox next to Randomize slide sequence. If you want the images to transition in the exact order you placed them in the editor, leave the checkbox unchecked.
14. Generally you should leave Use extra clear type corrections checkbox checked so that all clear type corrections can be used to smooth the contents of the slides. However depending on your skin design, sometimes you can get the undesirable page background color as the slide background color in Internet Explorer when this is enabled. In this case you can uncheck the checkbox to disable the extra corrections and this will eliminate the background color. However clear type corrections may be slightly noticeable as the text may look a little grainy for a second before it is corrected by the main clear type corrections.
15. Check the Pause Slideshow on Hover checkbox if you would like the slideshow to pause if the user mouses over the slideshow container.
16. In the field called Slide Duration in Milliseconds, specify the duration of the animated transition between slides, in milliseconds.
17. In the field called Slide Slide Transition Speed, specify the speed of the slide movement, in milliseconds.
18. Check the checkbox called Enable Slideshow Pager if you want the user to be able to click number links to control the slides or jump to a specific slide. By default the buttons will appear below the slide show.
19. Check the checkbox called Place Pager above Slideshow if you would like the pager to be displayed above the slideshow instead of in the default location below it.
20. Click the Save button.