Send an Email to Recipients
Prerequisite Step
Step-by-Step Instructions
1. Select the Email radio button in the Send Notifications dialog.
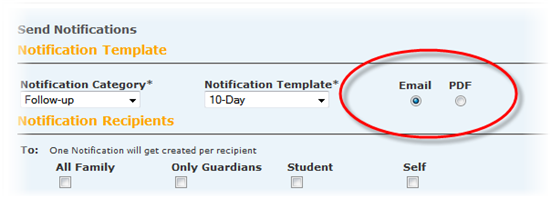
2. Choose the Notification Category from the drop-down menu.
3. Choose the Notification Template from the drop-down menu.
4. Determine who should receive the notification by checking the appropriate checkboxes:
-
All Family = Each family member associated with the user selected will receive a personalized version of the notification.
-
Only Guardians = Only family members associated with the user who also have the Guardian checkbox checked in their profile will receive personalized versions of the notification.
-
Student = The student his/herself will receive a personalized version of the notification.
-
Self = You (the sender) will receive a personalized version of the notification. (Sometimes senders like to send to self as a "sanity check" or confirmation that the notification is working as they desired.
5. Add persons to CC. Note that each person identified will receive 1 notification for each recipient specified with the checkboxes...So if the student has 10 family members defined in the system and checked the "All Family" checkbox, CC'd individuals will receive 10 emails--one personalized for each family member.
6. Click the Preview button to see what the personalized notifications will look like. Typically there is a page break in the preview between the notifications created for each recipient. Review the content and make sure you like it. If there is something you do not like, you may need to cancel this notification for the time being and edit the template.
7. Click the Create Notification button.
8. The emails will be sent and will be logged in each recipient's notification log.
Note: Once you have begun sending notifications, the system keeps track of all notifications sent to each user in a log. You can view a log of all notifications sent to a user.