Create and Manage Salary Notice Templates
Notification templates are used to mail-merge personalized salary notification documents for employees.
Applicable System Roles
- Human Resources
- Administrator
Step-by-Step Instructions
- Create Notification Category(s)
- Create Notification Template(s)
Create Notification Category(s)
-
Log into SchoolFront.
-
In the left navigation bar place your mouse on Manage Notifications and then click Manage Categories in the sub-menu.
-
Click New Notification Category link (green plus icon).
-
Enter a Name for the Category such as "Initial Salary Notices" or "Salary Notice Reminders."
-
Describe the Category in the Description field. (optional)
-
Choose the Notification Type of "Salary Adjustment" from the drop-down menu.
-
Click the Insert button.
-
Repeat these steps to create additional categories. We suggest to categories minimally: "Initial Salary Notices" and "Salary Notice Reminders."
Create Notification Template(s)
-
Log into SchoolFront.
-
In the left navigation bar go to Manage Notifications and then Notification Templates.
-
Click New Notification Template link (green plus sign icon).
-
Enter a Name for the template.
-
Describe the template (i.e. the purpose of the notification) in the Description field. (optional)
-
Choose one of the categories you created for "Salary Adjustment" from the drop-down menu such as "Initial Salary Notices."
Note: If there are no categories in the system yet, click here to see how to create categories.
-
Click the Insert button.
-
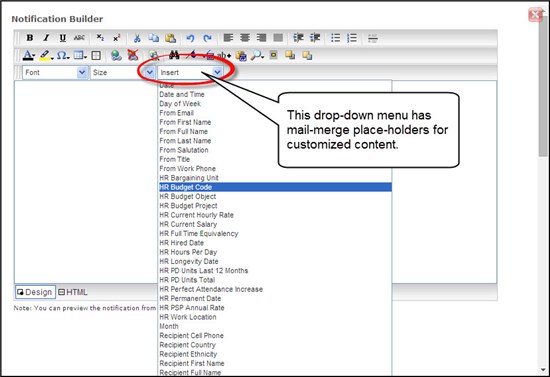
Click the Notification Builder link. A Rich Text editor will open.
-
Create your notification in the space provided using the formatting and standard word processing tools.
Note: To add dynamic user information to the notification using mail-merge capability, click the Insert drop-down menu and choose a field. When you actually send this notification, that dynamic placeholder will be updated with information specific to the person to whom the notification is sent.
The fields offered in the Insert drop-down menu are dependent on the Category Type you specified, "Salary Adjustments."
Example: If you insert " Dear --Recipient First Name--: into your template, when you send the templated notification to Mr. James George, Mr. Dean Agostini, and Mrs. Kathleen Karafonda, the notification they receive will actually read "Dear James" and "Dear Dean" and "Dear Kathleen."
Warning: If you add a dynamic input and you send the notification to a user for whom the specific data is not defined in SchoolFront, the place that the personalized information would have appeared in the notification received by the recipient will be BLANK.
For example, if you insert --Recipient Cell Phone--. The actual cell phone number of the recipient would be inserted in the notification each recipient receives, but if they do not have a cell phone number on record in SchoolFront, it would be blank and might not make sense.
Note: To edit the notification using HTML, click the HTML button at the bottom of the rich text editor. To toggle back to the WYSIWYG / word processor view, click the Design button.

-
Click the Save button.