Create a New Custom Tab to the Student Record
In addition to being able to add custom fields to the Student "Details" tab, system administrators can add up to 4 additional custom tabs with custom fields to the student profile.
Applicable System Roles
Step-by-Step Instructions
-
Login to SchoolFront as a system administrator.
-
Go to Feature Administration in the left navigation menu.
-
In the section called "Students" click "Custom Tabs."
-
On the "Custom Tabs" page, click the "New Custom Tab" link.
-
Enter the label that you would like to appear on the tab in the "Tab Name" field.
-
Click the "Enabled" checkbox to make the tab visible to other users in the system--Note that if you ever want to disable this custom tab, you can do so by un-checking the "Enabled" checkbox.
-
Next configure the custom data fields you want to view and edit on the tab:
-
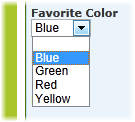
Add a List (Drop-Down Menu) Field:
-
In the section called "List Fields," write the name of the field in the "Alias."
-
To make the field visible, check the "Enabled" box. (alternatively, if you ever want to hide the field, un-check the "Enabled" box.")
-
Repeat for all of the drop-down menu fields you want to add.
-
To add options to your drop-down menu list, click the "Insert" button at the bottom of the screen.
-
The "List Items" tab will appear. Click the "List Items" tab.
-
Click the "New Tab List Item" link.
-
Select the Alias from the "Tab List Name" drop-down menu.
-
Enter the text you want to appear in the drop-down menu in the "List Item Name" field.
-
Click the "Save" button.
-
Repeat for all items you want to appear in your drop-down menus.
-
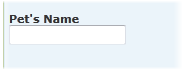
Add a Text Field:
-
In the section called "Text Fields," write the name of the field in the "Alias."
-
To make the field visible, check the "Enabled" box. (alternatively, if you ever want to hide any of these custom fields, un-check the "Enabled" box.")
-
Repeat for all of the text fields you want to add.
-
Click the "Insert" button at the bottom of the screen.
-
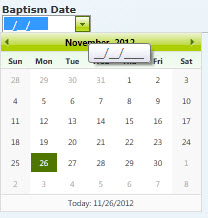
Add a Date Field:
-
In the section called "Date Fields," write the name of the field in the "Alias."
-
To make the field visible, check the "Enabled" box. (alternatively, if you ever want to hide any of these custom fields, un-check the "Enabled" box.")
-
Repeat for all of the date fields you want to add.
-
Click the "Insert" button at the bottom of the screen.
-
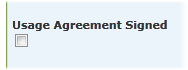
Add a Yes/No (Checkbox) Field:
-
In the section called "Yes/No Fields," write the name of the field in the "Alias."
-
To make the field visible, check the "Enabled" box. (alternatively, if you ever want to hide any of these custom fields, un-check the "Enabled" box.")
-
Repeat for all of the yes/no fields you want to add.
-
Click the "Insert" button at the bottom of the screen.
-
Click the Insert button to save the whole custom tab.
Note: Currently you can only create and manage 4 custom tabs in the system.