Determine Size and Storage Location of An Existing Image
In order to determine the appropriate size for and place on the server to upload a new or replacement image in any part of the SchoolFront CMS, you will want to determine the size and storage location of the current image(s).
Step-by-Step Instructions
1. Login to the SchoolFront Portal CMS site (you must have administrator permissions).
2. Go to the page with the image(s) which you would like to replace.
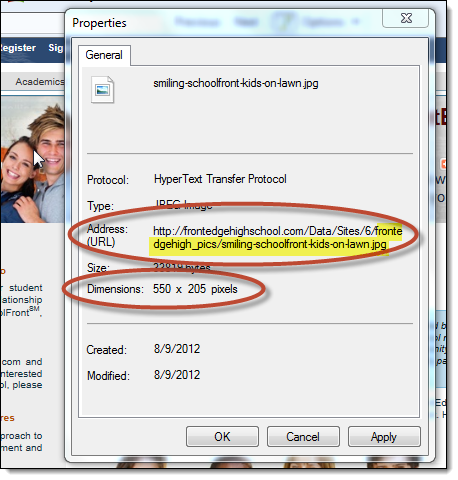
3. Before you click anything else, using your mouse right-click on one of the rotating images from the slide show and select Properties from the menu. Check out the dimensions. This is the size in pixels which you will need to make your replacement or additional images.

6. Make note of the Address (URL) of the image--this is how you will determine where to upload your images (it is the place on the server where the images are currently being stored so you'll want to upload your new images to the same location).
The relevant part of the address is the portion that comes after "http://yoursite.org/data/sites/6/" so in the example above, the part you need to note is highlighted in yellow.
5. Ensure that the images you want to add are correctly sized. If you want text to appear on the images, you will need to add that text in your image editing software.
6. Save the image(s) in a web-ready format (such as .jpg, .gif, or .png) in a location on your computer where it is easy to find the images.