Event Calendar Pro Overview
In addition to allowing you to track and display detailed events on your page, the Event Calendar Pro web-part has some powerful additional features which you can choose to use or not use depending on the purpose of the calendar:
- A Variety of Different ways to View the Calendar:
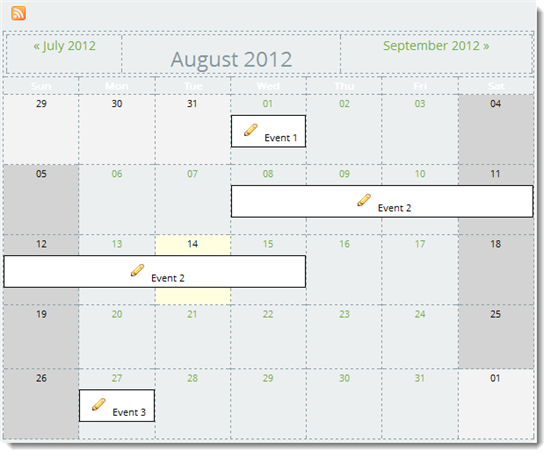
- Month View
- List View
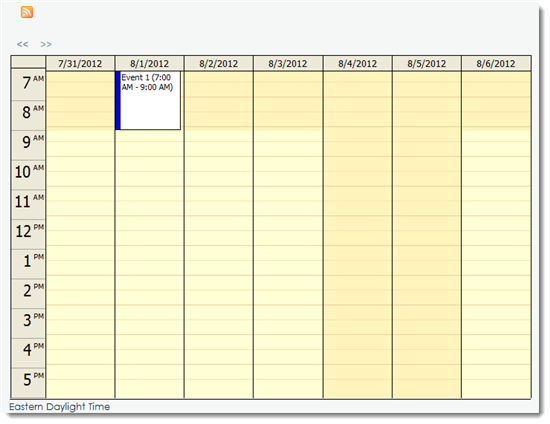
- Week View
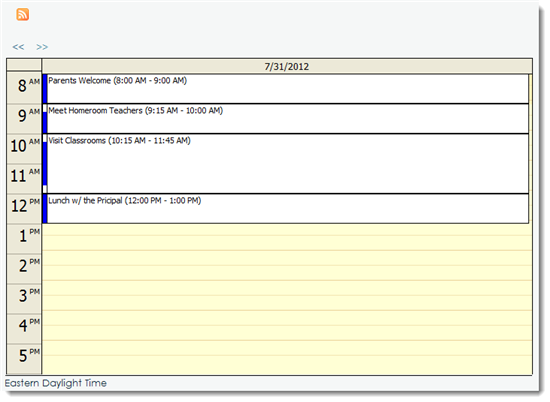
- Day View
- Timeline View
- Sell Tickets Online Using Authorize.NET, PayPal, or Google Checkout
- Require Registration for Events That Are Free
- Create a Calendar RSS feed
- Visitors can subscribe to event notification.
- Add a Feed Manager web-part to Combine the Events from Multiple Event Calendar Pro web-parts.
- Google Maps and Bing Maps are integrated so you can enter the location of your event and a Map will automatically be displayed, and optionally users can get driving directions or search for hotels or restaurants near your event.
Add an Event
-
Click the “Add Event” link.
-
On the “Event Settings” tab…
-
In the field called “What:” enter a title—Try to keep the title very short because this is the text that will appear in the Event Feed that you see in places like the homepage.
-
In the field called “When:” enter a start date and an end date.
-
If this is an all-day event, leave the “All Day” checkbox checked (e.g. “All Day” is for things like Christmas or someone’s birthday that literally lasts for full duration of the day or days you specified in the “When:” field). OR
If this is an event that lasts from a start-time to a finish-time, uncheck the “All Day” checkbox. Now you will be able to use the drop-down menus to specify a start-time and an end-time.
- If this is a one-time event, leave the “Repeats:” drop-down menu as “Does not Repeat.” OR
If this is a repeating event, select the cadence at which it will repeat from the “Repeats:” drop-down menu. (e.g. This is good for things like “Our Anniversary” which will repeat on the say date annually or for things like “Saturday at Lakewood” which will happen every Saturday until a specific date.
-
If you do choose a repeating cadence, you can have the repeat expire by entering an “until” date on which it will stop repeating at the cadence you specified. If you did not choose to repeat the event, just ignore the date in the “Until” field.
-
The “Location” field is optional, but must be filled in if you want to show the location of the event on a Google Map which will allow visitors to get driving directions.
-
If you choose to enter a location, enter a specific street address. If you are not specific, the map will not be able to display a location from Google Maps. It’s important that you put in an actual address and not something like “Disney Land” or “The School” Do not preface the street address with a title because it may confuse Google. As an example, for The School, you would enter “2100 School Road, City, NY, 12345.”
-
Check the checkbox for “Show Map” if you entered a viable street address. This will make it so that visitors see a Google Map of the location when they review the details of your event on the calendar.
-
The field called “Location Alias” is where you put the actual name of the location like “Disney Land” or “Our House.”
-
Leave the rest of the checkboxes as they are.
-
Click the “Details” tab (located next to the “Event settings” tab).
- Enter details about the event. Add text, images, videos, hyperlinks, etc. Here is additional information about adding content to the details: http://support.schoolfront.com/html-content.aspx
-
When you are done, click the “Save” button.
-
This will add the event (or events if it’s reoccurring) to your calendar.
-
If the event(s) are in the future, they will also eventually appear in the upcoming Event Feed when the feed synchs automatically with your calendar (it synchs about every 60 minutes).
Edit an Event
You can update or otherwise edit an event, for example if you have an event on the calendar for Saturday and you now want to add the If the event is part of a repeating series, you can edit one of the event instances or the whole series.
-
On the Calendar navigate to the event you want to edit.
-
Click the little pencil icon to open the event or one of the event instances in the series if it’s repeating.
-
Make the edits you desire on the “Event Settings” and the “Details tabs.
-
Now, either click the “Save” button if you wish to update just the one instance of the repeating event OR
Click the “Update All Recurrences” if you wish to have the changes you make reflected in all repeats of the event.
Delete an Event
If you do not want an event on the calendar any more, you can delete it. You can also delete a whole series of reoccurring events or just one event in a series.
-
On the Calendar navigate to the event you want to edit.
-
Click the little pencil icon to open the event or one of the event instances in the series if it’s repeating.
-
Scroll down and either click the “Delete” button to delete only the instance you currently have open, OR
Click the “Delete This Event and All Recurrences” if you wish to have the whole series of reoccurring events deleted as well.
Calendar Display & RSS Feed Configuration
Go into settings and you can customize your Event Calendar Pro's display quite extensively. As will other web-parts, you must click the Settings( ) button to configure this web-part. There is a good amount on on-page Help (
 ) content to assist you as you configure the web-part.
Combine Events from Multiple Separate Calendars into One Upcoming Events Listing
The events from several disparate Event Calendar Pro instances can be pulled into a single upcoming events listing using the Feed Manager web-part.
Many schools use a feed manager on their front page to show upcoming events. The events listing automatically updates, syncing with the calendars to show visitors only what's coming in the future. Events are listed in chronological order.
Manage Event Registration
Sometimes it's enough to just announce an event and see who shows up, but other times you may want to either know who will be attending your event or be able to restrict who can attend and/or how many people can attend the event. Creating an event in the CMS with registration required will allow you to set attendee parameters for your event and will then allow visitors to register for the event.
Manage Calendar Ticket/Registration Settings
Before you create an event you must configure Ticket/Registration settings on the calendar. You will do so in the Calendar settings area ().
Add Event With Registration Required
- Once you have configured Ticket/Registration settings for the whole calendar web-part, create a new event on the calendar (
 ).
).
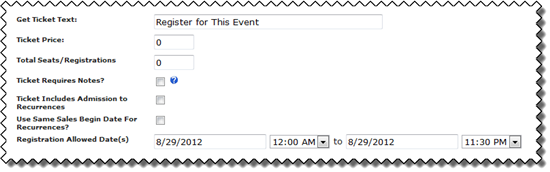
- On the Event Settings tab enter the standard information for scheduling and detailing your event, but before you click the Save button, check the checkbox that says "Requires Registration."
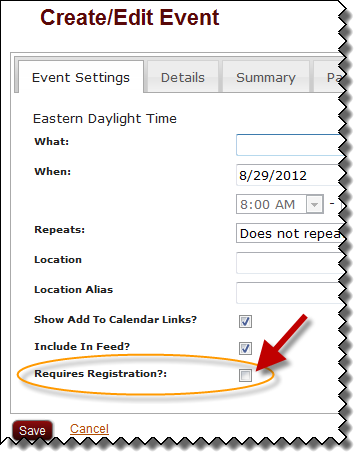
- When the checkbox is selected, registration parameters will be added to the Event Settings tab.