Manage Enrollment of Students in My Course
Generally schools will start with a bulk import of courses and enrollments and then have teachers "tweak" their own courses, correcting mistakes in the imported information and adding and deleting courses and students where appropriate.
If you find errors in the enrollment information imported by your school's administrator users, you can correct enrollment (add and remove students to the course) for courses that are associated with you as the teacher.
Applicable System Roles
System users with the following roles can do this:
Step-by-Step Instructions
1. Login to SchoolFront as a teacher.
2. Click the Course Enrollment Option option in the left-hand navigation menu. All courses that have been added to the system for the year will appear in the Course Management course list.
4. Locate the course for which you would like to manage enrollment and click the Magnifying Glass icon.

5. The course you chose will be highlighted in the list, and the details for the highlighted course appear below the course list.

6. Click the Enrollment Tab. This tab allows you to add and remove students from the course roster.

7. All students in the school are listed on the left in the Available Students box. Students enrolled in the course are in the Selected Students box.
8. To enroll students in the course, select the student(s) from the list on the left (they will be highlighted if you click on them), and then click the Enroll Selected button. The student(s) you selected will be moved to the Selected Students (enrolled students) list on the right.
9. To remove a student(s) from the course, select the student(s) from the list on the right (they will be highlighted if you click on them), and then click the Remove Selected button. The student(s) you selected will be moved to the Available Students list on the left.
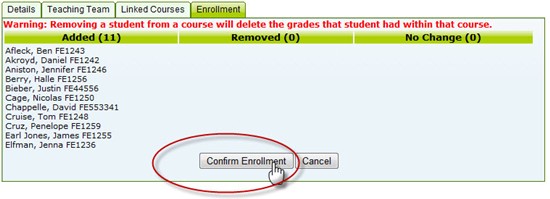
Warning: If you remove a student from the roster, any grades or attendance that you have logged for the student for the course will be deleted.
10. Once you have all of the students you want enrolled in the course (and only those students) displayed in the right-hand Selected Students box, click the Submit Enrollment button to save the changes you made.
11. A screen with a summary of all of the changes you made will open. Double check to be sure that you are satisfied with the changes (remember that if you remove a student all of the student's grades and attendance will be deleted). If you change your mind about deleting a student, click the Cancel button.
12. When you are satisfied with the work click the Confirm Enrollment button.